Kwiqli Admin Dashboard & Navigation
Welcome to the Kwiqli Admin User Navigation Guide. This section provides an overview of the Kwiqli Admin Portal, helping administrators understand the platform layout, key features, and navigation tools to efficiently manage users, invoices, payments, and account settings.
- Dashboard
- Customers
- Products
- Invoices
- Settings
- Activity Logs
- Support
- Email Templates Quickstart Guide
Dashboard
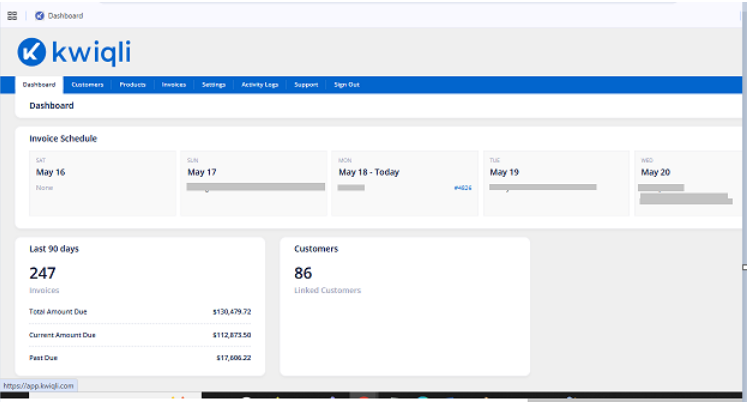
The Dashboard provides a centralized overview of billing activity, customer statistics, and upcoming invoice schedules. It serves as the main landing page for administrators after logging in to Kwiqli.
From the Dashboard, administrators can quickly monitor invoice activity, track outstanding balances, and navigate to all major modules within the platform.
Accessing the Dashboard
After logging in to the Kwiqli Admin Portal, the Dashboard opens automatically.
You can return to the Dashboard at any time by clicking the Dashboard tab in the top navigation menu.
Dashboard Navigation
-
Dashboard
-
Customers
-
Products
-
Invoices
-
Settings
-
Activity Logs
-
Support
-
Sign Out
Invoice Schedule
The Invoice Schedule section displays upcoming scheduled invoice runs organized by billing date.
Each schedule card displays:
-
Billing Date
-
Customer Name
-
Associated Invoice Number (if generated)
This section helps administrators:
-
Monitor upcoming invoice generation
-
Verify billing schedules
-
Track recurring customer invoices
Last 90 Days Summary
The Last 90 Days widget provides a billing summary for recent invoice activity.
Displayed metrics may include:
Total Invoices
Displays the total number of invoices generated during the selected time period.
Total Amount Due
Displays the total outstanding invoice balance.
Current Amount Due
Displays invoice balances that are currently due but not overdue.
Past Due
Displays overdue invoice balances requiring follow-up.
This section helps administrators:
-
Monitor accounts receivable
-
Track billing performance
-
Review overdue balances
Customers
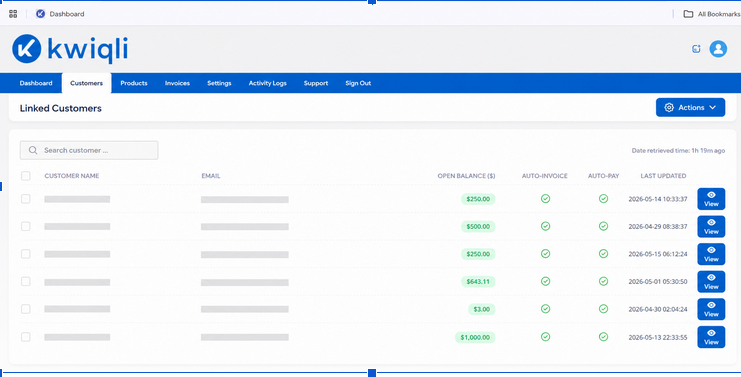
The Customers module is used to manage customer accounts, billing configurations, portal access, and integrations.
Important: Customers must first be connected and synchronized with QuickBooks Online before they can be managed in Kwiqli.
Viewing Customers
-
Click the Customers tab.
-
Review the customer list.
-
Use the Search bar to locate a customer by:
-
Customer name
-
Company name
-
Email address
-
Click View beside a customer to open the account.
Functions
-
View customer balances
-
Check Auto-Invoice status
-
Check Auto-Pay status
-
Review account updates
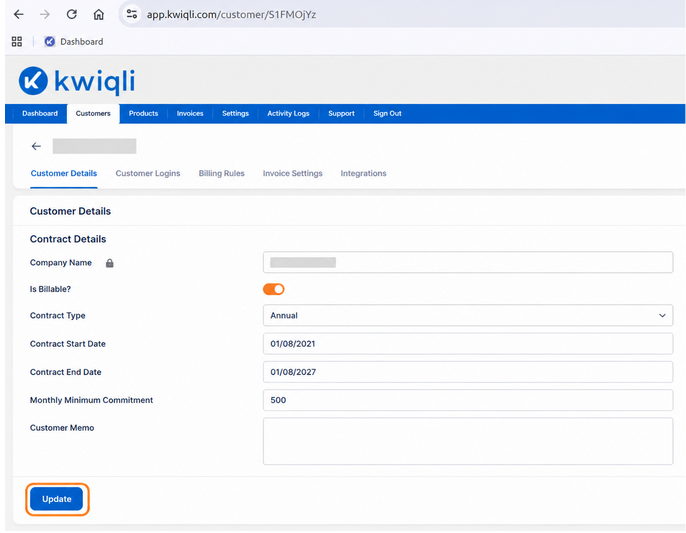
Customer Details
-
Open a customer profile.
-
Select the Customer Details tab.
-
Update the following information as needed:
-
Contract Type
-
Contract Start Date
-
Contract End Date
-
Monthly Minimum Commitment
-
Customer Memo
-
Enable or disable the Is Billable toggle.
-
Click Update to save changes.
Functions
-
Manage customer billing eligibility
-
Store contract details
-
Add internal account notes
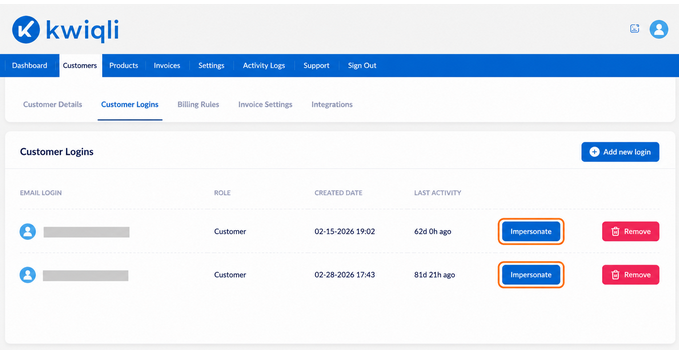
Customer Logins
-
Open a customer profile.
-
Click the Customer Logins tab.
-
To add a portal user:
-
Click Add New Login
-
Enter the customer email
-
Assign the role
-
Save the login
-
To remove access:
-
Click Remove
-
To troubleshoot customer access:
-
Click Impersonate
Functions
-
Manage customer portal access
-
Troubleshoot customer accounts
-
Monitor portal activity
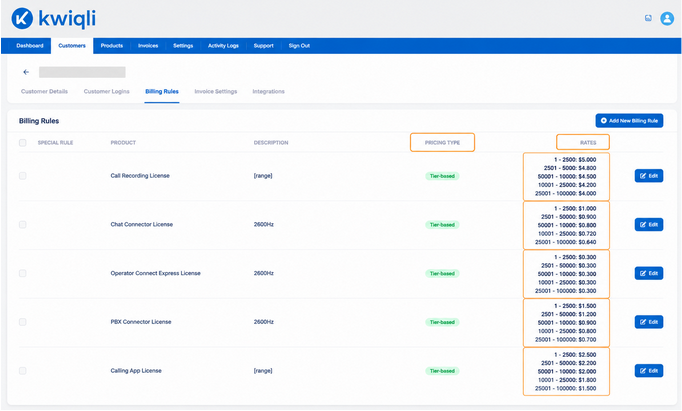
Billing Rules
-
Open a customer profile.
-
Select the Billing Rules tab.
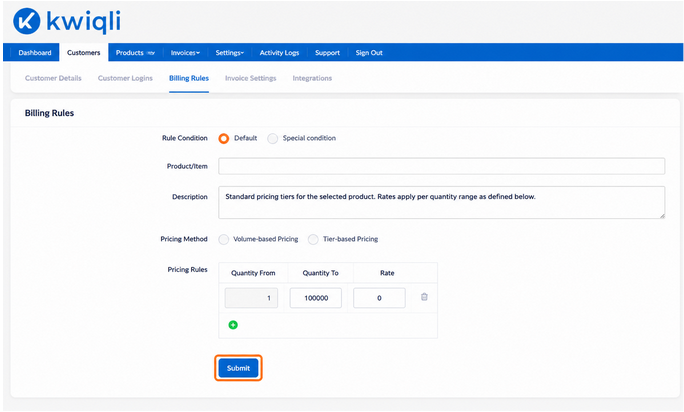
-
Click Add New Billing Rule.
-
Configure:
-
Product
-
Pricing Type
-
Tiered Pricing
-
Descriptions
-
Save the billing rule.
-
To edit a rule:
-
Click Edit
-
Update the configuration
-
Save changes
Functions
-
Automate recurring billing
-
Configure tier-based pricing
-
Manage usage billing
Understanding Billing Rules
A Billing Rule is an automated billing configuration that tells Kwiqli how and when to charge a customer for a product or service.
Billing Rules automatically generate invoice charges based on predefined pricing and billing settings, eliminating the need for manual invoice creation.
Common Uses for Billing Rules
Billing Rules can be used for:
-
Recurring monthly services
-
Usage-based billing
-
Tier-based pricing
-
Minimum monthly commitments
-
Annual or one-time charges
Example
A customer may be billed monthly for:
-
Calling App Licenses
-
Call Recording Licenses
-
Support Services
Tier-Based Pricing Example
|
Quantity Range |
Price Per Unit |
|
1–2500 |
$5.00 |
|
2501–5000 |
$4.80 |
|
5001–10000 |
$4.50 |
How Billing Rules Work
-
Create a Product or Service
-
Assign the Product to a Customer
-
Configure Pricing and Billing Logic
-
Enable Auto-Invoice
-
Kwiqli Automatically Generates Invoice Charges
Benefits of Billing Rules
-
Automates recurring billing
-
Reduces manual invoicing
-
Improves billing accuracy
-
Supports tiered and usage pricing
-
Simplifies customer billing management
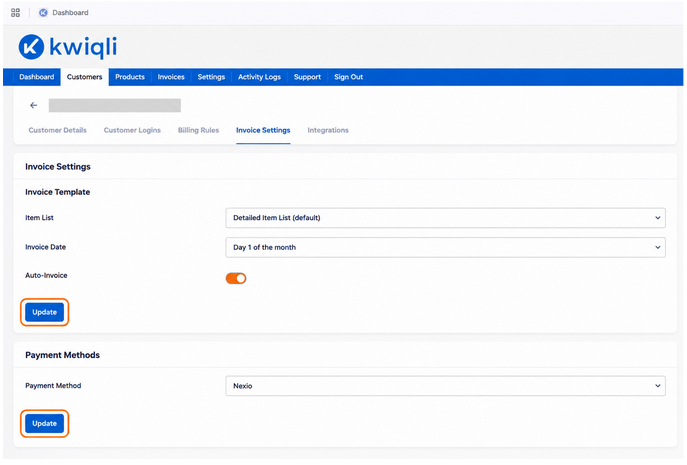
Invoice Settings
-
Open a customer profile.
-
Select the Invoice Settings tab.
-
Configure:
-
Invoice Template
-
Invoice Date
-
Auto-Invoice
-
Payment Method
-
Click Update after making changes.
Functions
-
Configure customer billing schedules
-
Enable automatic invoice generation
-
Assign payment gateways
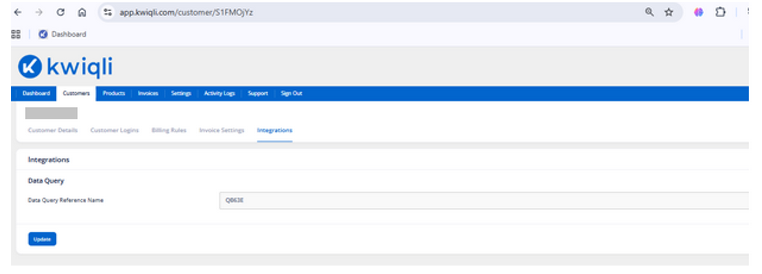
Customer Integrations
-
Open a customer profile.
-
Click the Integrations tab.
-
Enter the customer integration reference or QuickBooks ID.
-
Click Update.
Functions
-
Store QuickBooks customer references
-
Link external systems
-
Configure customer-specific integration
Products
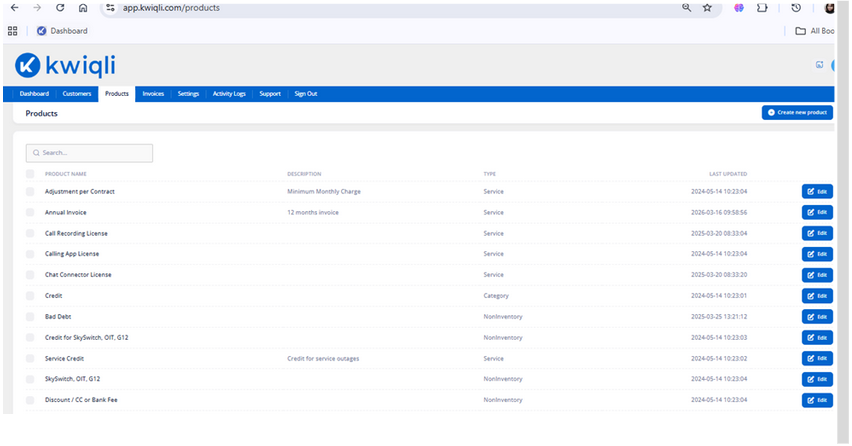
The Products module manages products and services used for billing and invoicing.
Viewing Products
-
Click the Products tab.
-
Review the product list.
-
Use the Search field to locate products.
Functions
-
Review available products
-
Check product types
-
View synchronization status
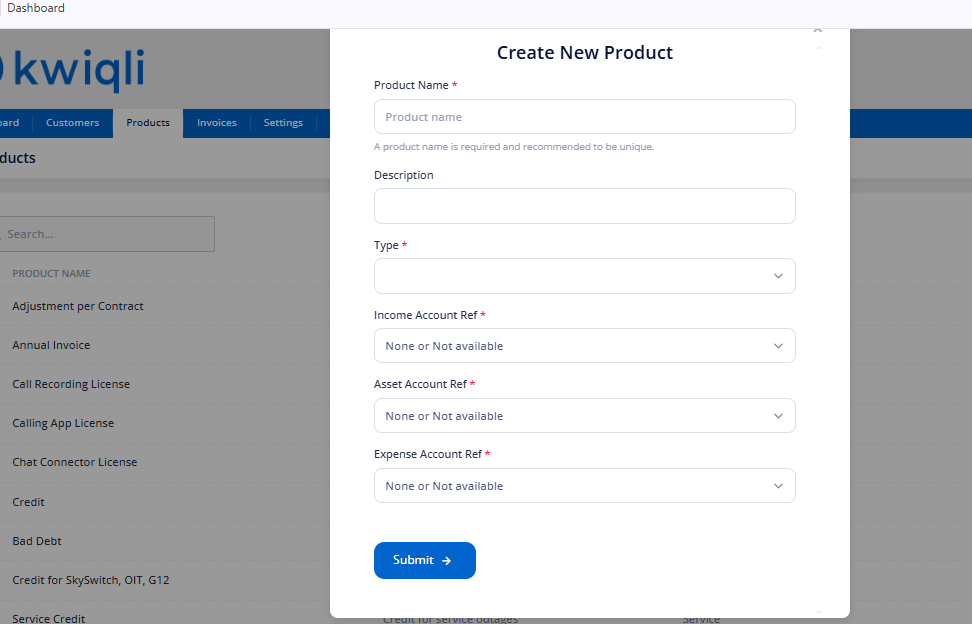
Creating a Product
-
Click Create New Product.
-
Enter:
-
Product Name
-
Description
-
Product Type
-
Click Submit.
Functions
-
Add billable services
-
Configure invoice products
-
Sync products to QuickBooks
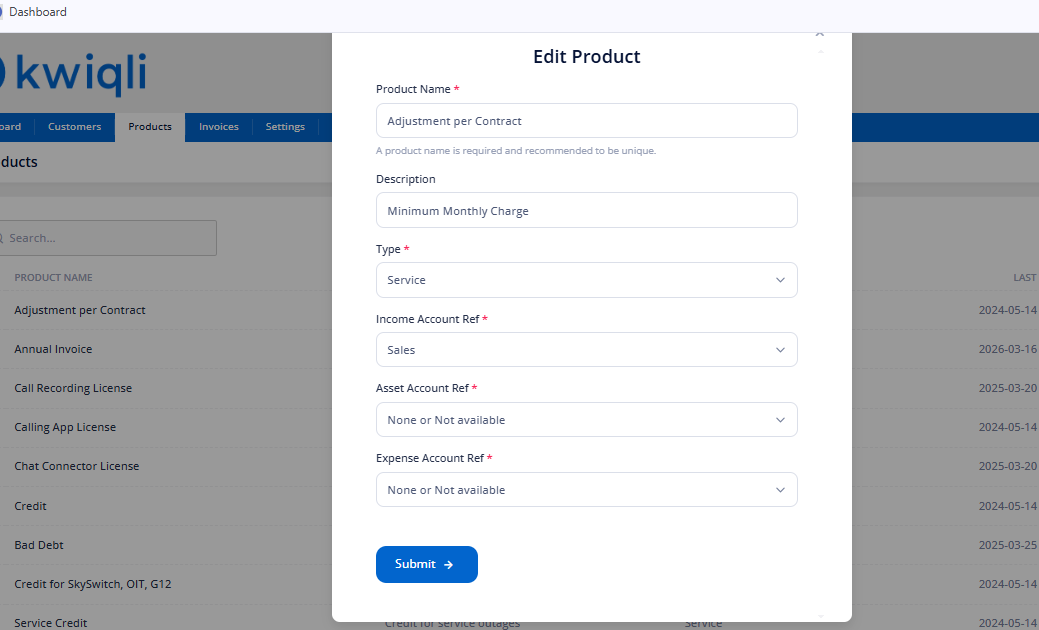
Editing Products
-
Locate the product.
-
Click Edit.
-
Update the product information.
-
Submit changes.
Functions
-
Modify pricing information
-
Update billing descriptions
-
Manage active services
Invoices
The Invoices module manages invoice creation, tracking, and payment monitoring.
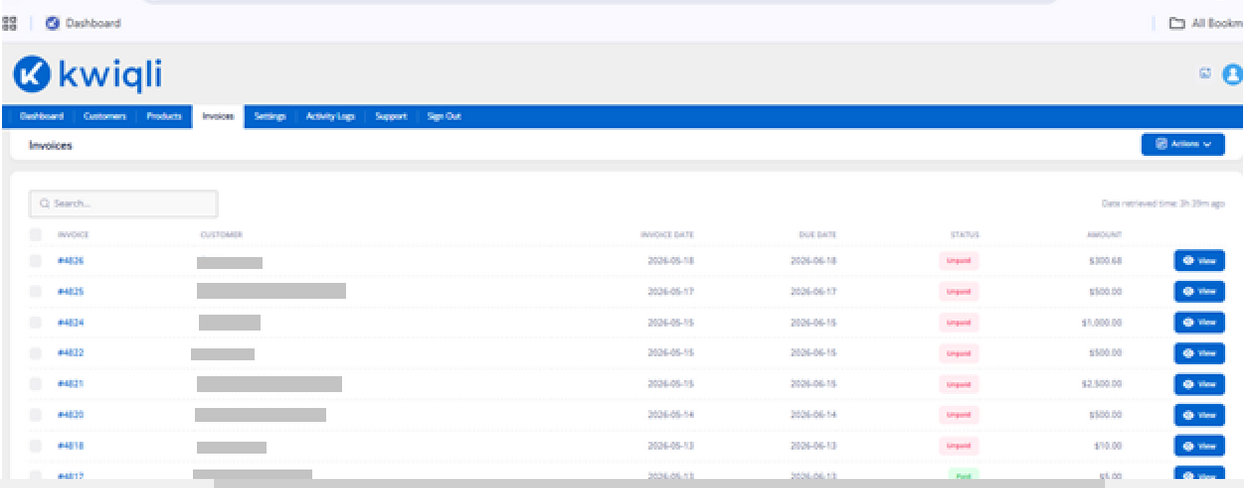
Viewing Invoices
-
Click the Invoices tab.
-
Review invoice records.
-
Use the Search field to locate invoices.
Functions
-
Track payment status
-
Review invoice balances
-
Monitor due dates
Viewing Invoice Details
-
Locate an invoice.
-
Click View.
-
Review:
-
Line items
-
Customer details
-
Payment status
-
Invoice history
Functions
-
Audit billing details
-
Verify invoice accuracy
-
Review payment activity
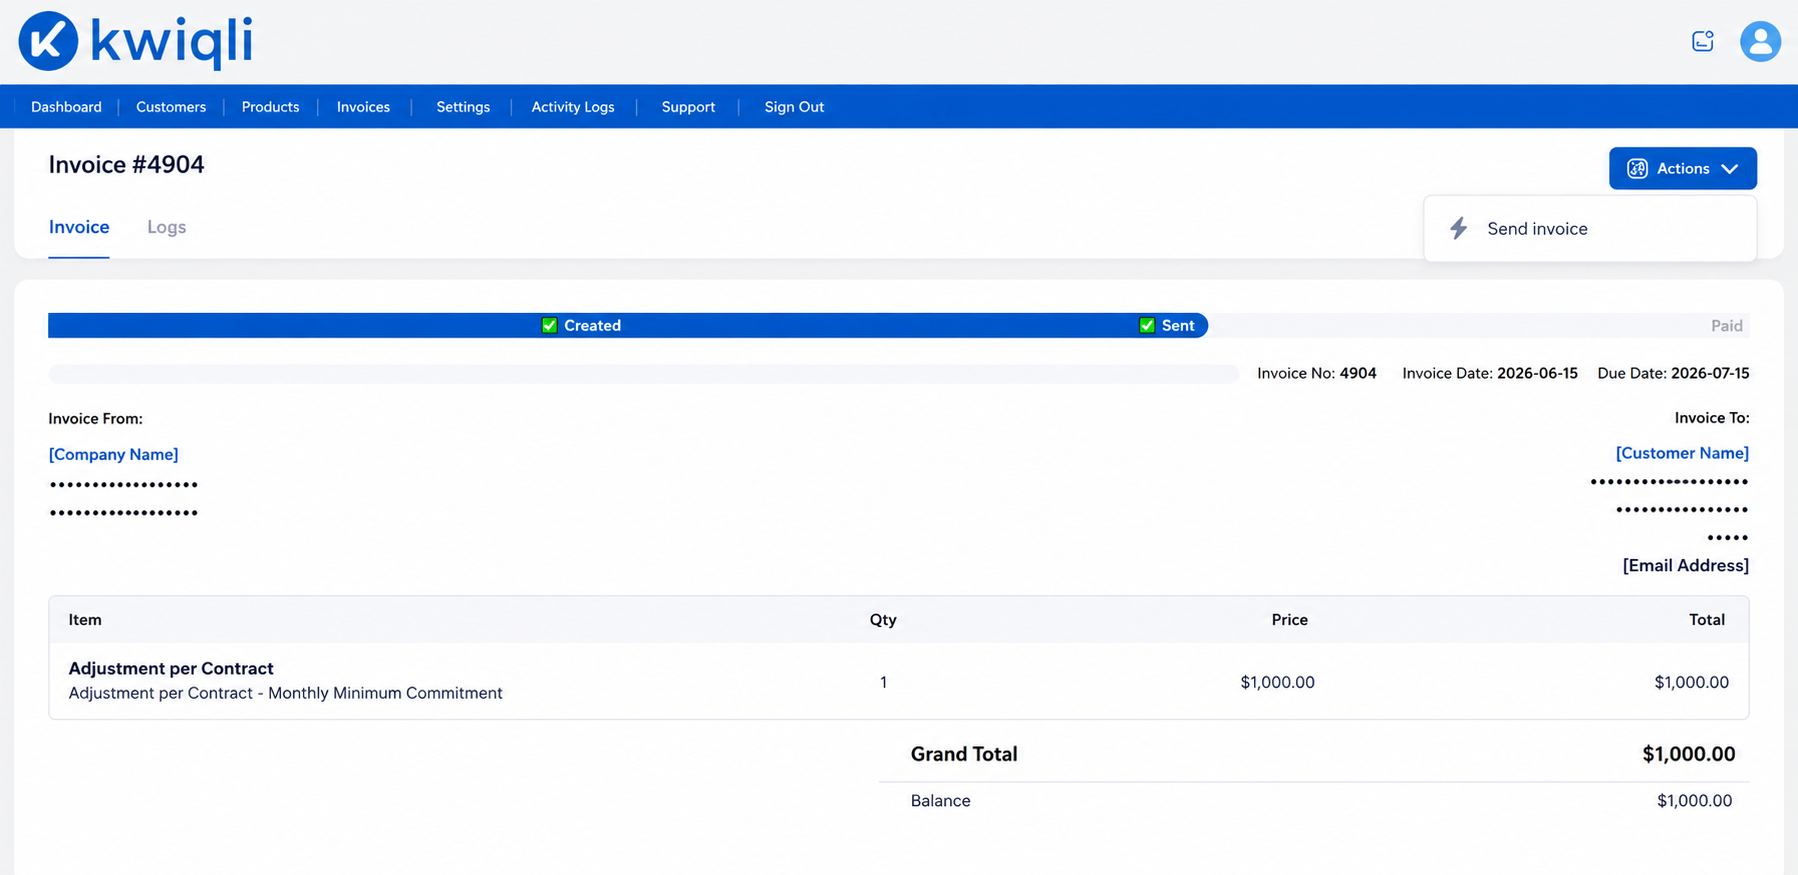
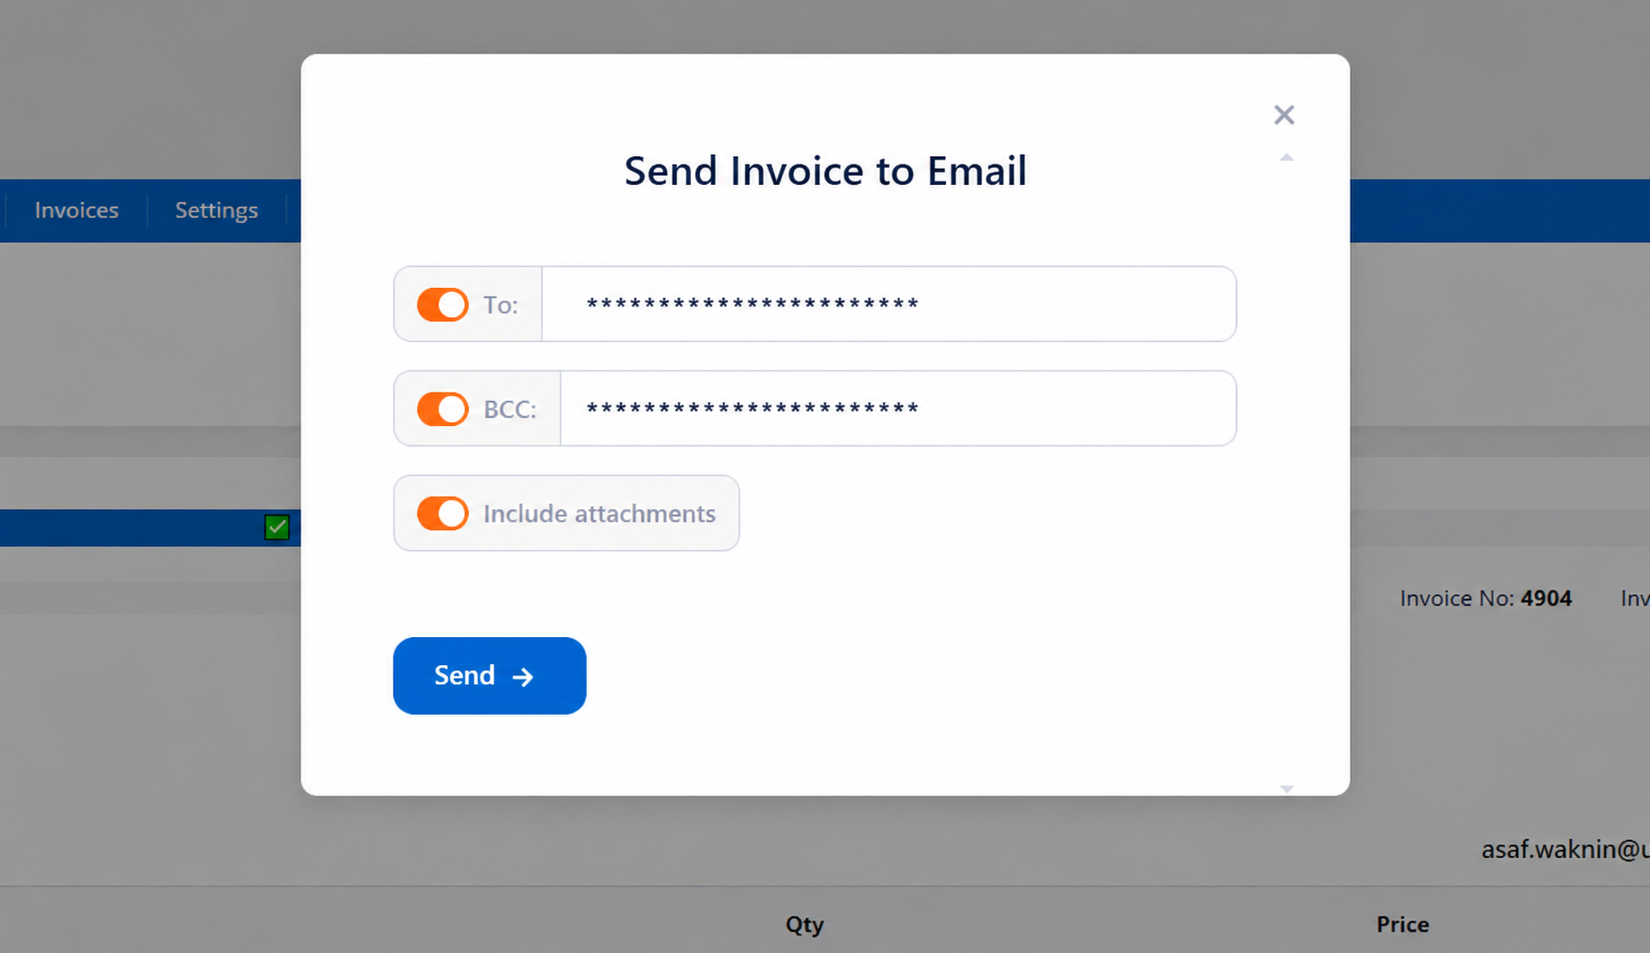
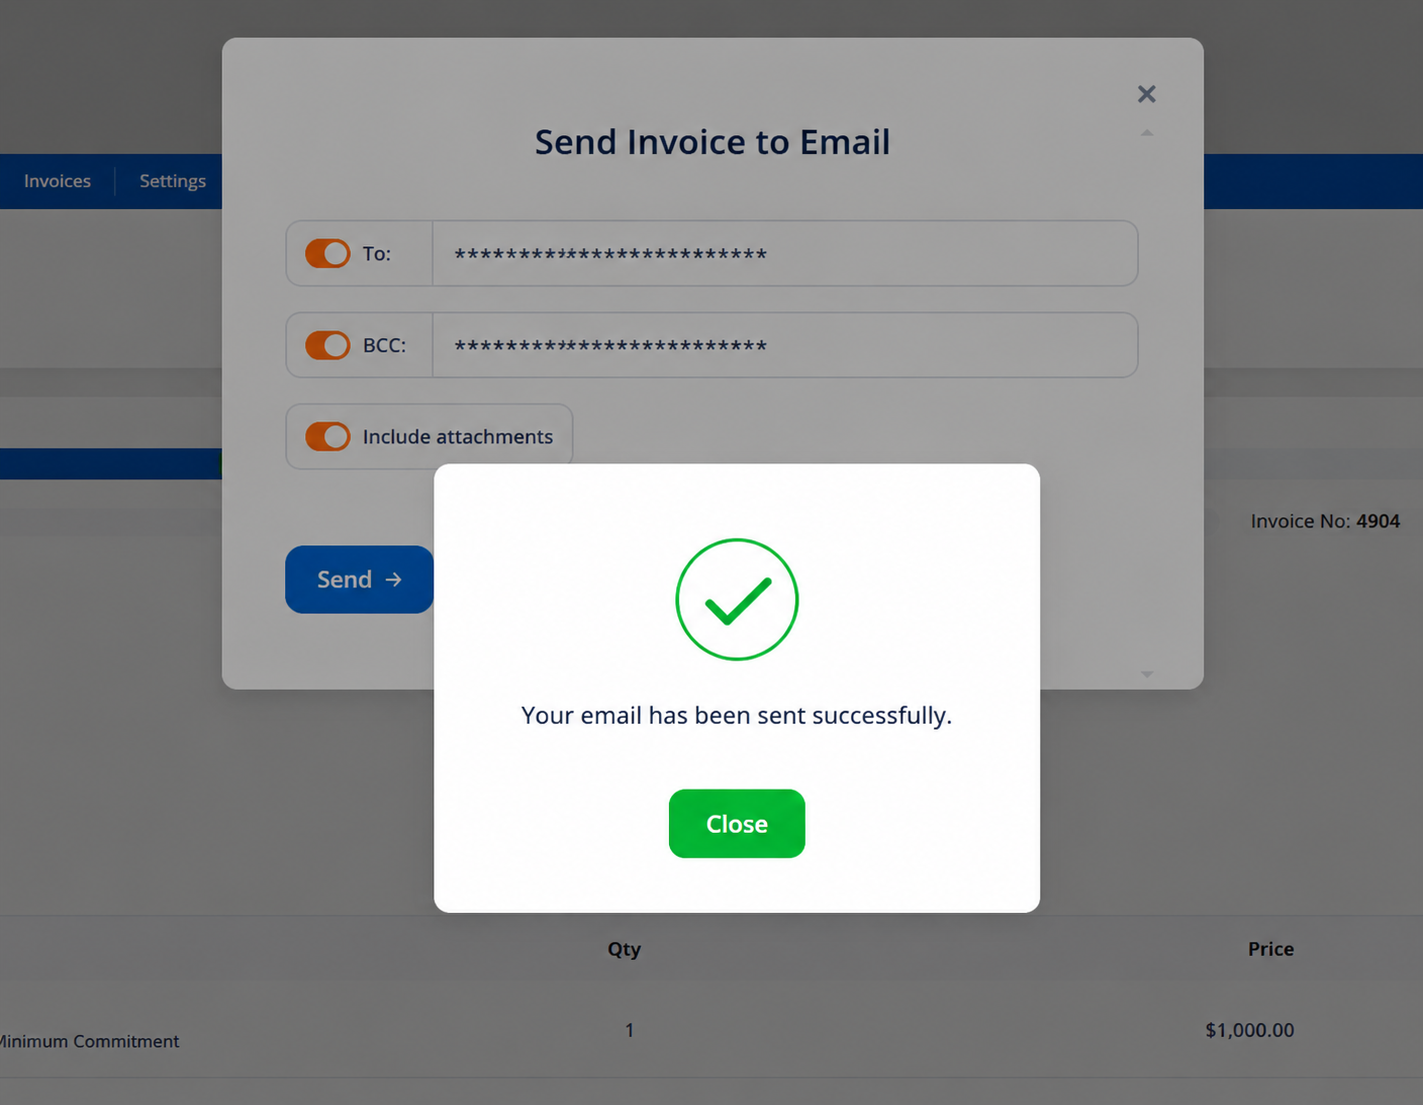
Sending an Invoice
You can send an invoice directly to your customer from the Invoice Details page.
Settings
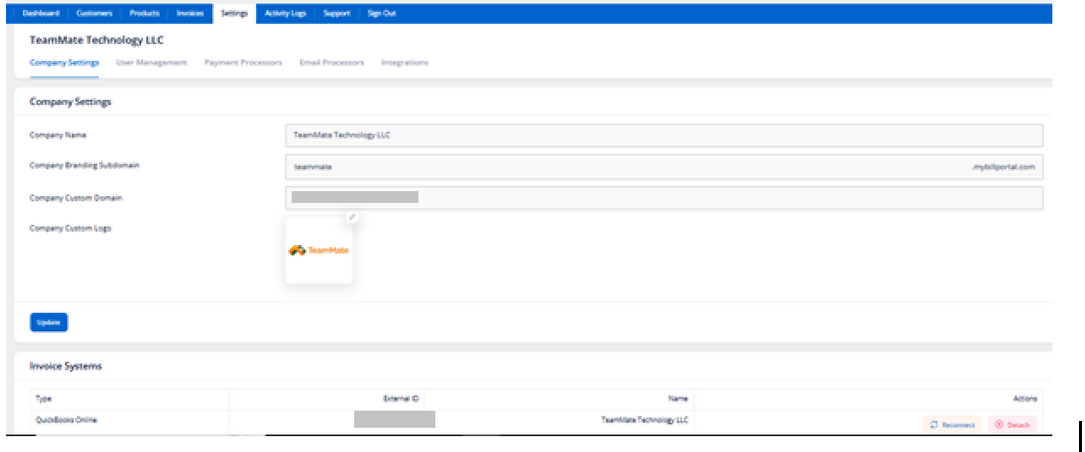
The Settings module manages organization-wide system configurations.
Company Settings
-
Click Settings.
-
Open Company Settings.
-
Update:
-
Company Name
-
Branding Subdomain
-
Custom Domain
-
Company Logo
-
Click Update.
Functions
-
Configure white-label branding
-
Customize customer portal appearance
-
Manage QuickBooks integration
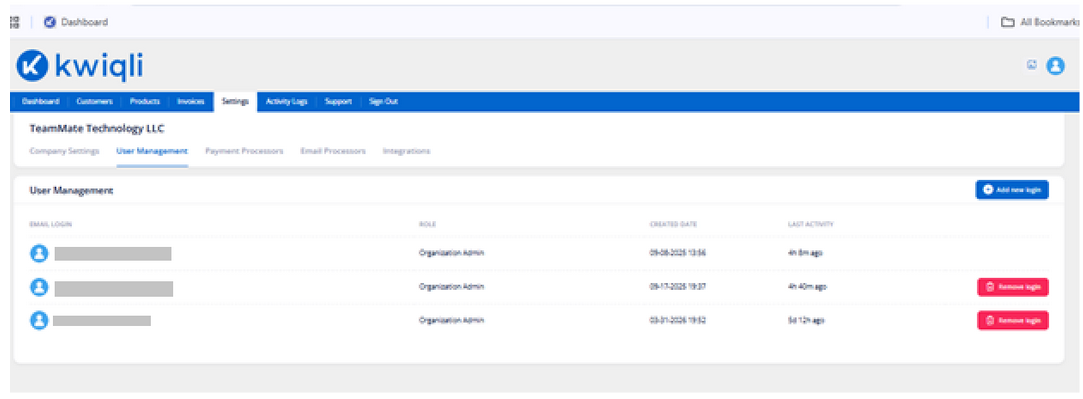
User Management
-
Open the User Management tab.
-
To add a user:
-
Click Add New Login
-
Enter email address
-
Assign role
-
To remove a user:
-
Click Remove Login
Functions
-
Manage administrator access
-
Assign user permissions
-
Monitor user activity
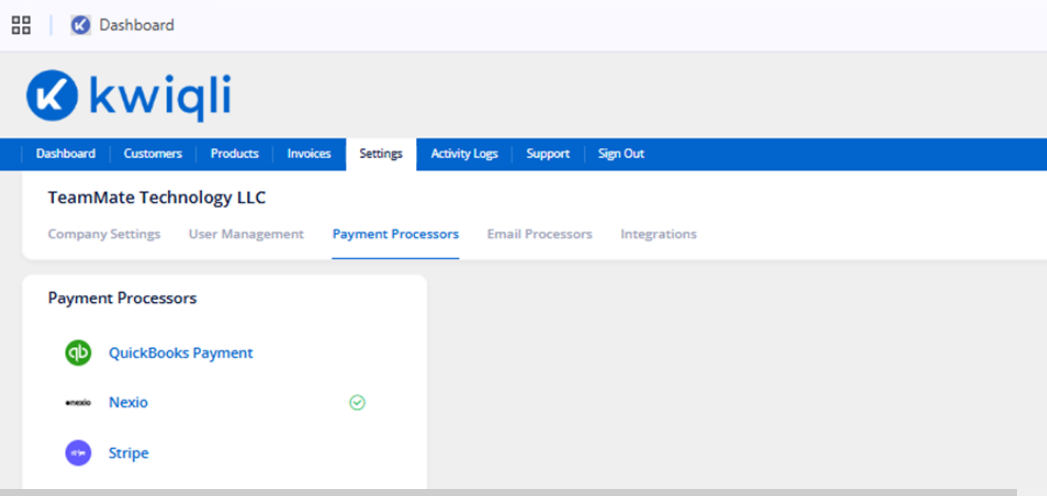
Payment Processors
-
Open the Payment Processors tab.
-
Review available gateways:
-
QuickBooks Payments
-
Nexio
-
Stripe
-
Verify active integrations.
Functions
-
Process customer payments
-
Enable Auto-Pay
-
Configure recurring billing
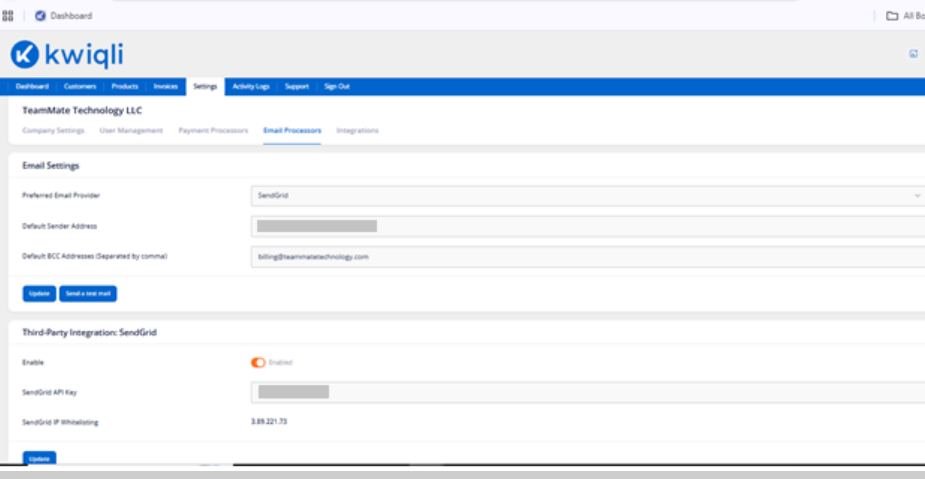
Email Processors
-
Open the Email Processors tab.
-
Configure:
-
Preferred Email Provider
-
Default Sender Address
-
BCC Addresses
-
Configure SendGrid API settings if applicable.
-
Click Update.
-
Use Send Test Mail to verify email delivery.
Functions
-
Send invoices
-
Deliver payment reminders
-
Manage customer notifications
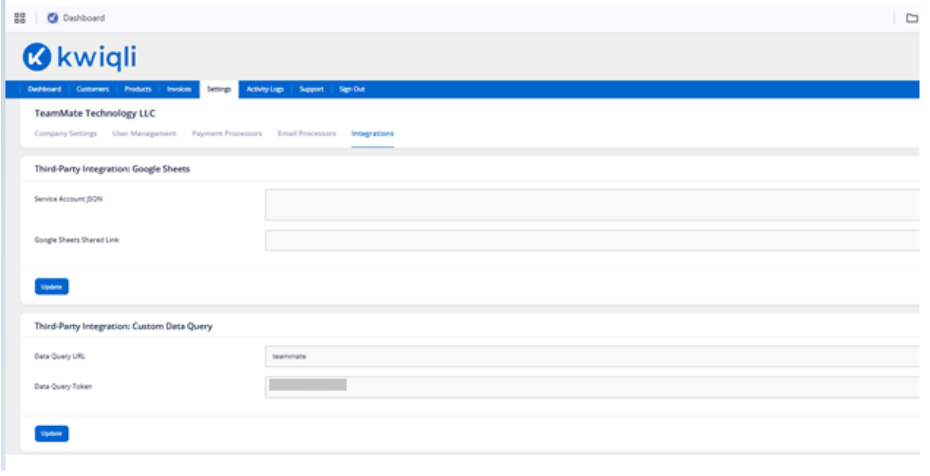
Integrations
-
Open the Integrations tab.
-
Configure:
-
Google Sheets integration
-
Service Account JSON
-
Data Query URL
-
API Tokens
-
Click Update after changes.
Functions
-
Import usage data
-
Automate invoice quantities
-
Connect external billing systems
Activity Logs
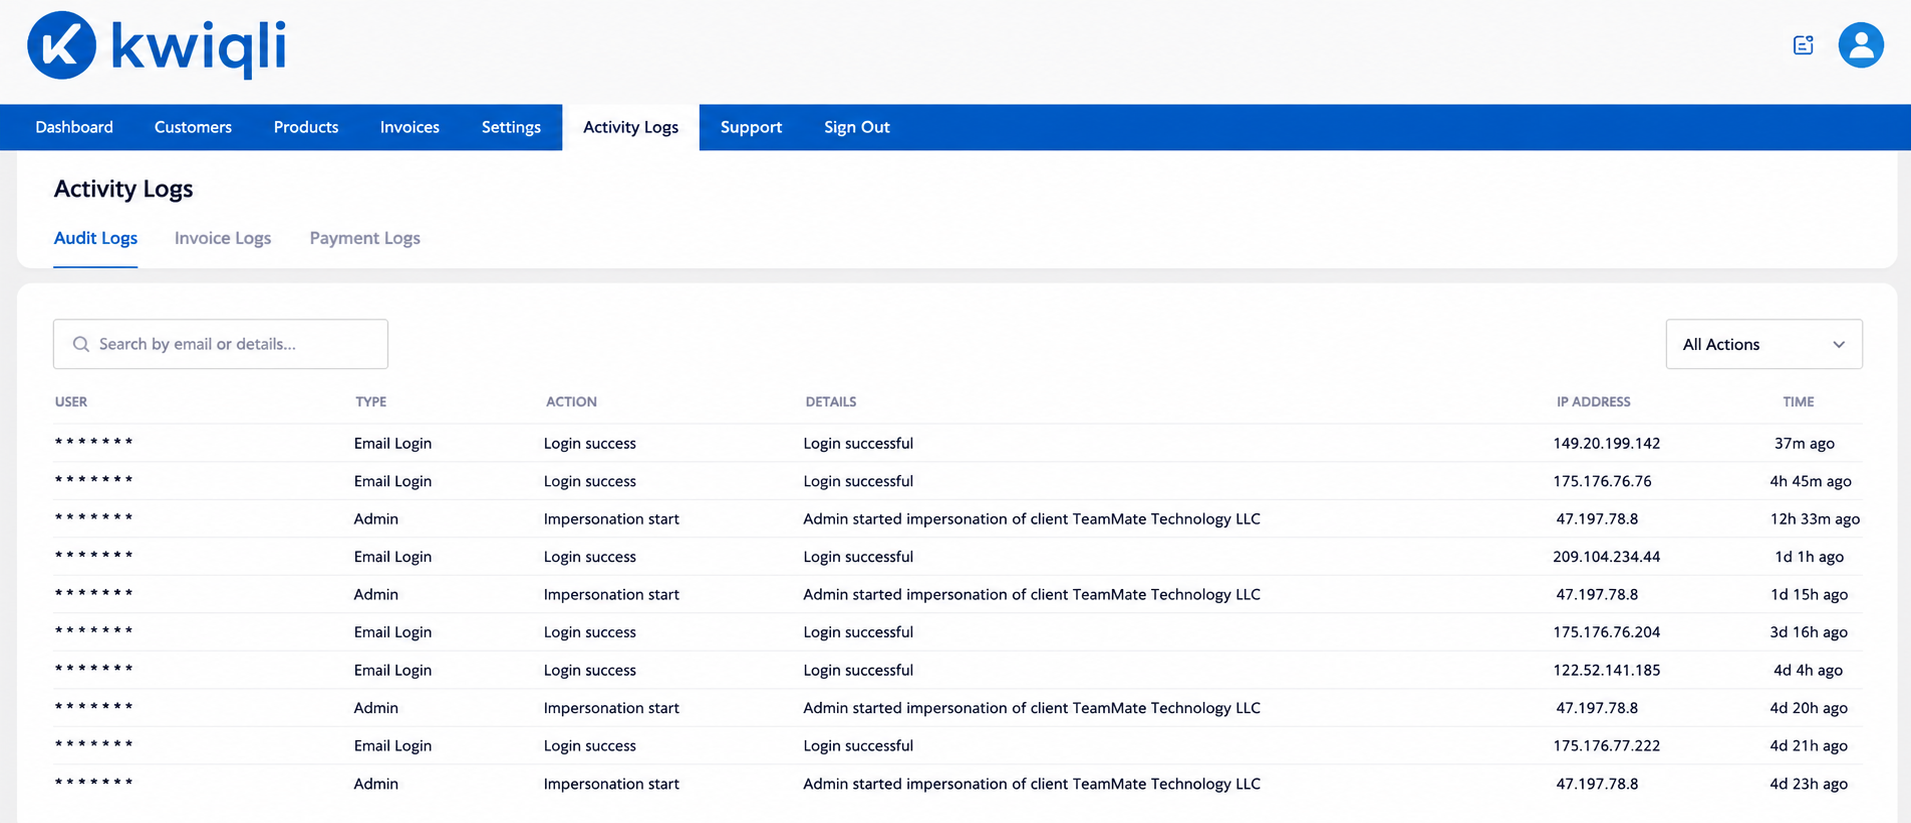
The Activity Logs track user and billing activity within Kwiqli.
Audit Logs
-
Click Activity Logs.
-
Review:
-
User logins
-
Administrative actions
-
Settings changes
-
Use filters or Search to locate records.
Functions
-
Monitor user activity
-
Review login history
-
Audit system changes
Support
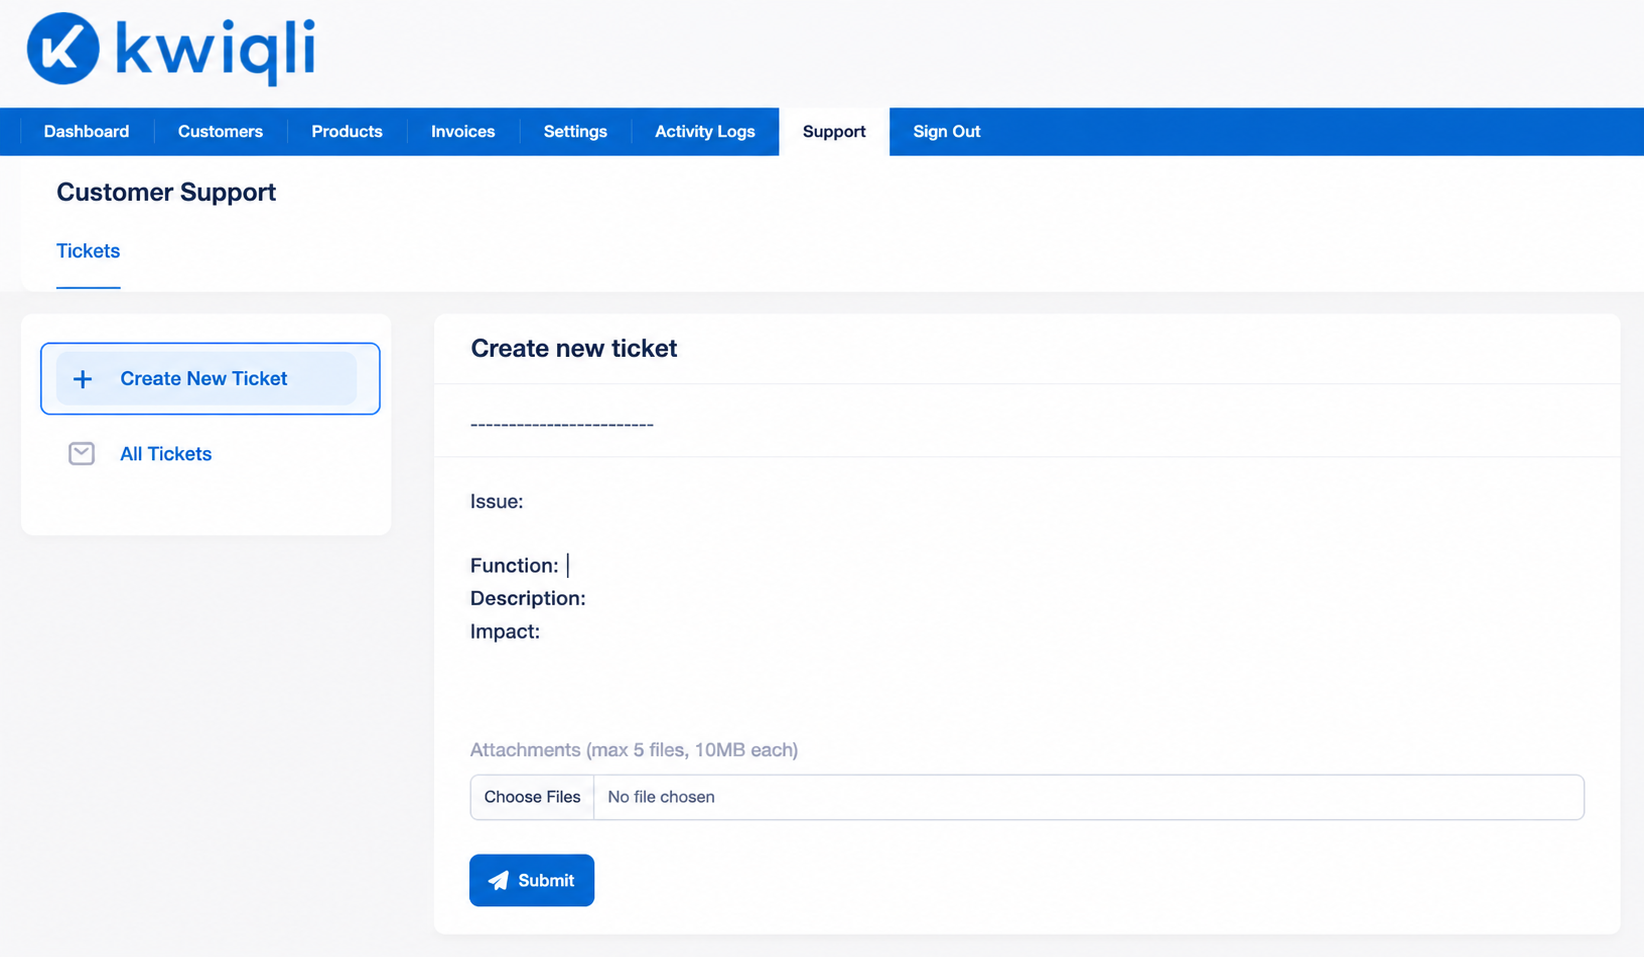
The Support allows administrators to create and manage support tickets.
Creating a Support Ticket
-
Click the Support tab.
-
Select Create New Ticket.
-
Enter:
-
Ticket Subject
-
Description
-
Supporting details
-
Submit the ticket.
To check the status of your existing tickets click the "All Tickets"
Functions
-
Report billing issues
-
Request technical support
-
Track issue resolution